The Geode tie-dye technique is nothing but a geode-style tie-dye. That means its specialty is on its special geode patterns or styles. The geode tie-dye technique is mostly the same as the normal tie-dye technique. The only difference on the binding and tie style. Tie-dyeing is a great way to create unique and vibrant designs, but if you want to take it up a notch, geode tie dye is the perfect technique.
It creates an eye-catching pattern that will make any garment more beautiful. Geode tie dye uses folding and binding techniques to create its signature look, so you must find instructions that will give you the best results. Let’s start the geode tie-dye technical tutorial.
The Geode tie-dye technique is completed with two simple steps:
- The technique of making the geode for tie-dye.
- Dyeing of this special geode with tie-dye technique.
1. How to make geode tie dye
If you’re a fan of tie dye, you may have heard of the geode technique. This unique method produces stunning results that resemble natural geodes found in rocks and minerals. With just a few simple instructions, you can create your own geode tie dye Pattern
What you need:
- White T-shirt: This fabric is for tie-dye t-shirts.
- String (Hard/strong): For binding the tie tightly.
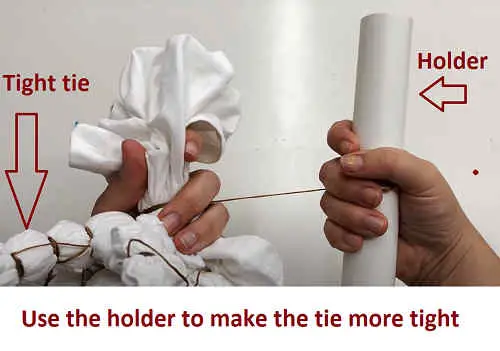
- Holder: For making the ties more strong.
This video will show the easiest way to create the perfect Geode pattern for tie-dye. Let’s see—-
2. How to do geode tie-dye step by step?
Tie-dye is a popular and fun way to add some color and personality to your clothes. One of the latest techniques in tie-dyeing is geode tie-dye, where you create unique patterns that resemble the beautiful rock formations found in nature. This technique uses a combination of folding, tying, and dyeing to create stunning designs that are truly one-of-a-kind.
There are many different techniques of geode tie-dye. Here we will show the ice geode tie dye process step by step:
Required materials:
- Tie-dye geode pattern t-shirt: I well-patterned geode t-shirt which I discussed in previous steps.
- Ice: Need some ice pieces for making tie-dye.
- Magic tracks: These tracks are used to hold ice, t-shirts, soda ash, dyes, etc.
- Large Plastic container This is used for holding all the used dyes, water, soda ash and
- A rack: Rack is used to hold all things and works like a filter.
- Soda ash: For better fixation.
- Dyes: It depends on your choice. In this process, we use; sea foam, raven, Imperial purple, and sapphire blue.
Once you have all of your supplies ready and prepped, it’s time to start folding! Begin by laying out your garment flat on a surface – this will be the canvas for your geode design.
Next up is the actual tying process steps:
Step 1: Take the rack on the container.
Step 2: Put the geode garment (bonded t-shirt) on it.
Step 3: Use the magic track to create the fancy.
Step 4: Put all ice on the geode t-shirt.
Step 5: Put all the dyes on ice.
Step 6: Then put soda ash on the ice.
Here is the video to clear all the steps:
Corky Lorenz
Most important Geode tie-dye instruction:
There are some special things in this tie-dye process. If you do not follow the instruction you will not get the actual result. Let’s start…
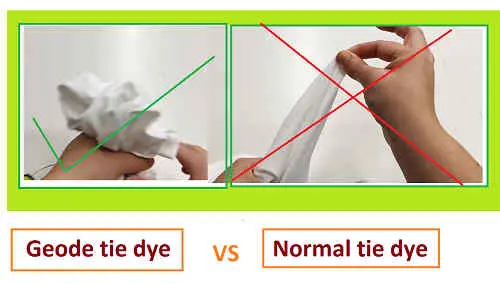
Folding way selection: Here you have to select the massive way. You should not select the like-as-usual tie-dye way selection. Follow the image for a better understanding.
Tie tightness: Make your tie super tight. This tightness creates the geode design. If you tie the fabric in loose you will fail to create the special geode design.
Space between two ties: It depends on you. This means depends on your choice. But it’s better to make it between 0.7 inches and 1 inch.
Geode tie dye patterns:
Geode tie dye patterns have recently become a popular trend in the world of fashionable clothing. This technique involves using a unique process that creates bold, vibrant designs resembling the natural patterns found inside geodes. The intricate and colorful designs make for stunning statement pieces that are sure to turn heads.
The geode tie dye process starts with preparing the fabric by soaking it in water and wringing it out thoroughly. Next, you will need to fold and twist the fabric into a specific pattern, creating creases that resemble geode formations. After folding, you will apply different colors of dye onto each section, making sure to blend them seamlessly for an authentic look.
Once all sections are dyed, you will wrap your fabric in plastic wrap and let it sit for several hours or overnight to allow the dye to fully soak into the fibers.
Geode tie dye styles:
Geode tie dye is a unique and fascinating technique that has taken the fashion world by storm. It involves creating patterns on fabric that resemble the mesmerizing and intricate designs found in geodes, which are rocks with crystal-filled cavities. This dyeing method is achieved through a multi-step process that requires precision and creativity, resulting in one-of-a-kind pieces.
The process of creating geode tie dye starts with preparing the fabric, usually cotton or silk. Once the fabric is ready, it is folded and secured with rubber bands to create a pattern. The next step involves applying different colors of dye to specific areas of the fabric using a dropper or spray bottle. The colors blend, creating a stunning effect reminiscent of geodes.
There are many patterns you can achieve with geode tie dye depending on how you fold your fabric and where you apply the dyes.
Why the Geode tie-dye technique is so popular in the present trend:
The geode tie-dye technique is taking the fashion industry by storm. This unique and creative process has become increasingly popular in recent times due to its intricate patterns and stunning results. The geode tie-dye method involves using a range of colors to create a crystallized effect on fabric, resembling the natural beauty of geodes.
The process of creating a geode tie-dye pattern is not an easy one. It requires skill and precision to achieve the desired result. To begin with, you need to choose your base color and apply it evenly onto the fabric. Next, you will need to prepare your dye solution by mixing water, soda ash, and dye powder before applying it over the base color in various circular patterns using squeeze bottles or syringes.
As a result of this intricate process, stunning patterns are created that resemble actual geodes.
Different Geodye tie-dyeing techniques are discussed below:
Geode tie dye without ice:
Geode tie dye is a popular technique that creates mesmerizing patterns on fabrics. While the traditional method involves using ice, there’s an alternative way to achieve this stunning effect without it. The process may vary depending on the fabric type and dye brand, but the basic steps are similar.
To create geode tie dye without ice, start by soaking your fabric in water and then wringing it out. Next, arrange the cloth in a spiral pattern and secure it with rubber bands. You can also use other tying techniques like crumpling or folding to create different patterns. Once you’re happy with the design, mix your chosen dye color according to the instructions and apply it to the fabric using a squeeze bottle or brush.
After applying the dye, cover your fabric with plastic wrap or place it inside a sealable bag for several hours (check instructions for the exact time).
Geody tie-dye shirt:
Tie-dye has been a popular fashion trend for decades, but the latest technique to hit the runway is geode tie-dye. This unique process involves using natural stone patterns to create intricate designs and color combinations that resemble geodes. Geode tie-dye has quickly become a favorite among fashion enthusiasts due to its visually stunning appearance and one-of-a-kind patterns.
The process of creating geode tie-dye is more complex than traditional tie-dye methods. It involves folding and twisting the fabric in specific ways to mimic the organic shapes found on natural stones. Once the fabric is folded, it’s wrapped with rubber bands to create compartments where the dye can be applied. The dye itself is carefully selected based on the desired color combination and is applied using various techniques such as pouring, dripping, or spraying.
Geode tie dye hoodie:
Geode tie dye is a popular technique that combines the beauty of natural stones with vibrant colors. The process involves creating intricate patterns on fabric by tying it in various ways and then applying dye to create a marbled effect. Each piece of clothing created using this technique is unique, as the patterns are impossible to replicate.
To achieve the geode tie dye effect, first, you need to choose a garment made of natural fibers like cotton or silk. Then, wet the garment before folding it into pleats or twisting it into different shapes. Secure these folds using rubber bands or string before applying dye in multiple layers. Finally, let the fabric dry completely before removing the ties and washing out any excess dye.
The resulting patterns can resemble beautiful geodes with their unique swirls and hues.
Geode tie-dye rubber bands
Geode tie-dye rubber bands are a popular trend in the fashion industry. This unique technique involves creating patterns that resemble the natural formations found inside geodes. The process begins by twisting and tying rubber bands around the fabric, which is then immersed in dye to create striking patterns.
The beauty of geode tie-dye lies in its unpredictability. No two patterns are exactly alike, making each item one-of-a-kind. To achieve the distinctive look of a geode, multiple colors are used to create contrasting shades and depth. Additionally, the placement and size of the rubber band twists can greatly influence the final pattern.
To get started with this technique, you will need some basic supplies such as white fabric, rubber bands, and dye. Once you have your materials ready, begin by folding or twisting your fabric into various shapes before securing it with rubber bands.
Reverse Geode tie dye
Reverse Geode tie dye is a unique technique that takes inspiration from the natural patterns found inside geodes. Unlike traditional tie-dye techniques where the colors are applied to the fabric, Reverse Geode is achieved by removing color instead of adding it. The result is a mesmerizing pattern that resembles crystalline structures commonly found in geodes.
The process of creating Reverse Geode tie dye is not as complicated as it may seem. First, you will need to gather your materials which include fabric dye remover, rubber bands, and fabric dye. Next, twist and bind your fabric with rubber bands into various shapes and sizes to create different patterns. Then apply the dye remover according to instructions and rinse out excess residue before proceeding to add your chosen fabric dyes.
One of the most exciting aspects of Reverse Geode tie-dye is the endless possibilities for patterns that can be created using this technique.
Single geode tie dye:
Geode tie dye is a technique that has taken the fashion industry by storm. This unique process involves creating intricate patterns on fabric that resemble the natural formations found in geodes. The result is a stunning, one-of-a-kind design that’s sure to turn heads.
The geode tie dye technique involves folding and twisting fabric in various ways to create different patterns. Once the desired pattern has been achieved, the fabric is secured with rubber bands or string before being dipped into a dye bath. The colors are carefully chosen to mimic the vibrant hues found inside geodes, with shades of blue, purple, pink, and green being popular choices. After soaking for several hours, the fabric is rinsed and washed before being revealed as a beautiful piece of wearable art.
No two geode tie-dye designs are exactly alike- each design is unique!
At the final:
In conclusion, the geode tie-dye technique is a great way to add a unique and beautiful design to any fabric. With the right materials and steps, you can easily create a stunning piece of art in no time. It’s important to be mindful of safety when working with dyes, so be sure to wear gloves, protective eyewear, and old clothes that you don’t mind getting dirty.
You may read some other articles: