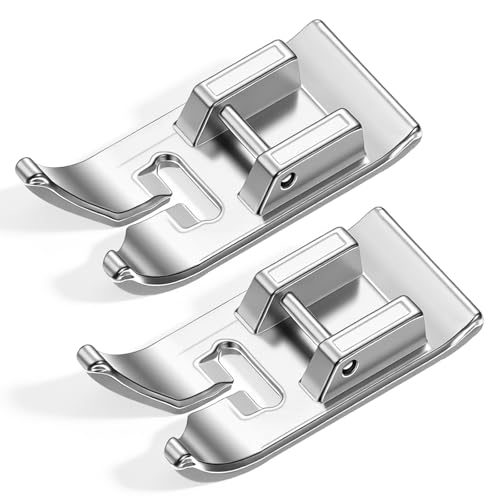
Sewing is a skill that has seen a resurgence in popularity, with many crafters and DIY enthusiasts picking up the needle and thread. One of the essential tools in any sewing kit is the sewing machine foot, particularly the 1/4 sewing machine foot. This specialized foot is designed to help create precise seams, making it an indispensable tool for quilters, garment makers, and anyone looking to achieve professional-looking results. In this article, we’ll explore the benefits of using a 1/4 sewing machine foot, how to use it effectively, and some tips and tricks to get the most out of your sewing projects.
What is a 1/4 Sewing Machine Foot?
The 1/4 sewing machine foot is specifically designed for creating a 1/4-inch seam allowance, which is crucial for quilting and piecing fabric together accurately. This foot features a guide on the side that helps you align your fabric precisely, ensuring consistent seam allowances. It is compatible with most sewing machines, but it’s always wise to check your machine’s manual for compatibility.
Benefits of Using a 1/4 Sewing Machine Foot
Using a 1/4 sewing machine foot offers several advantages, especially for those serious about their sewing projects. Here are some of the primary benefits:
- Precision: The 1/4 foot allows for precise seam allowances, which is vital for quilting and garment sewing.
- Consistency: Achieving consistent seam widths helps maintain uniformity across your project, making it look more professional.
- Time-Saving: With the guide on the foot, you can sew faster without constantly measuring and adjusting your fabric.
How to Use a 1/4 Sewing Machine Foot
Using a 1/4 sewing machine foot is relatively straightforward, but it does require some attention to detail. Here’s a step-by-step guide:
Step 1: Install the Foot
To start, remove your regular presser foot by following your sewing machine’s instructions. Attach the 1/4 sewing machine foot securely to the machine.
Step 2: Set Up Your Machine
Adjust your machine’s stitch settings as needed. Most projects will use a straight stitch with a standard stitch length.
Step 3: Align Your Fabric
Place your fabric under the foot, aligning the edge of the fabric with the guide on the foot. Ensure that it is straight to avoid crooked seams.
Step 4: Start Sewing
Lower the presser foot and start sewing. Keep the fabric aligned with the guide as you sew, maintaining a steady speed for the best results.
Step 5: Finish and Press
Once you’ve finished sewing, remove the fabric and press the seams open or to one side, depending on your project’s requirements.
Different Types of 1/4 Sewing Machine Feet
Not all 1/4 sewing machine feet are created equal. Here are some variations you might consider:
| Type | Description |
|---|---|
| Standard 1/4 Foot | A basic foot designed for standard sewing machines, ideal for most quilting projects. |
| 1/4 Foot with Guide | This foot features a built-in guide that helps maintain the 1/4-inch seam allowance more easily. |
| Walking Foot | A 1/4 foot that attaches a walking mechanism, allowing for better handling of multiple layers and thicker fabrics. |
| Patchwork Foot | Designed specifically for patchwork sewing, often with markings for various seam allowances. |
Maintaining Your 1/4 Sewing Machine Foot
To ensure the longevity and performance of your 1/4 sewing machine foot, regular maintenance is essential. Here are some tips:
Cleaning
Keep your foot clean from lint and debris by brushing it off with a soft brush. You can also use a damp cloth for stubborn residue.
Storage
Store your foot in a protective case or a designated compartment in your sewing machine accessory box to avoid damage.
Inspection
Regularly inspect the foot for signs of wear and tear. If you notice any damage, consider replacing it to maintain optimal performance.
Common Issues and Solutions
Even experienced sewers may encounter challenges when using a 1/4 sewing machine foot. Here are some common problems and how to address them:
Problem: Skipped Stitches
This can occur if the foot is not properly attached or if the needle is dull.
Solution: Ensure the foot is securely attached and replace the needle if needed.
Problem: Uneven Seams
Uneven seams can result from misalignment or varying sewing speeds.
Solution: Focus on keeping the fabric aligned with the guide and maintain a steady speed while sewing.
Problem: Foot Jumps or Shifts
If the foot shifts during sewing, it can create uneven seams.
Solution: Check that the foot is correctly locked in place and that you are using the appropriate foot for your machine.
A: While a 1/4 sewing machine foot is versatile, it’s best suited for lighter to medium-weight fabrics. For heavy fabrics, consider using a walking foot version.
A: Generally, you can use the standard straight stitch settings, but always refer to your sewing machine manual for specific recommendations.
A: While not strictly necessary, a 1/4 sewing machine foot is highly recommended for accurate seams in quilting projects.
Conclusion
In the world of sewing and quilting, the 1/4 sewing machine foot stands out as an essential tool for achieving precision and consistency in seam allowances. By understanding how to use and maintain this foot, you can elevate your sewing projects and create professional-quality work. Whether you are a beginner or a seasoned pro, investing in a quality 1/4 sewing machine foot will undoubtedly enhance your sewing experience. Don’t forget to explore additional resources like Why Aunt Martha’s Embroidery is a Crafter’s Dream! or our Perfect Beginner Embroidery Kit: Fun & Easy to Learn! for more sewing tips and tools.