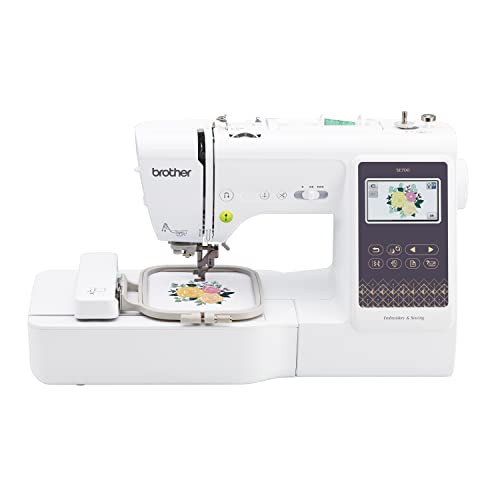
The Brother Pacesetter PC 8200 embroidery machine has garnered attention from both amateur and professional embroiderers for its impressive features and user-friendly design. Whether you are looking to create intricate patterns or simple monograms, this machine offers a variety of functionalities to meet your embroidery needs. In this article, we’ll explore the machine’s specifications, features, and how it stands out in the crowded market of sewing and embroidery machines.
Table of Contents
- Features of the Brother Pacesetter PC 8200
- Setting Up Your Brother Pacesetter PC 8200
- How to Use the Brother Pacesetter PC 8200
- Maintenance Tips for Longevity
- Comparing the PC 8200 with Other Machines
- FAQs
Features of the Brother Pacesetter PC 8200
The Brother Pacesetter PC 8200 is packed with features designed to enhance your embroidery experience. Here are some key features that stand out:
1. Large Embroidery Area
With a generous embroidery area, the PC 8200 allows you to work on larger projects without the need for constant repositioning. This makes it ideal for creating intricate designs on garments, home decor, and more.
2. Built-in Designs and Fonts
This machine boasts a variety of built-in embroidery designs and fonts, allowing you to add personalized touches to your projects without the need for additional software or downloads.
3. User-Friendly Interface
The LCD touchscreen display simplifies navigation through menus, making it easy for users to select designs, adjust settings, and preview their work. This feature is especially beneficial for those new to machine embroidery.
4. Advanced Needle Threading System
The advanced needle threading system takes the hassle out of threading the needle, allowing you to spend more time creating and less time troubleshooting. This feature is particularly useful for beginners who may struggle with traditional threading methods.
5. Multiple Stitch Options
The Brother Pacesetter PC 8200 offers a wide range of stitch options, including decorative stitches, quilting stitches, and more. This versatility means you can use the machine for various sewing tasks beyond embroidery.
Setting Up Your Brother Pacesetter PC 8200
Setting up your Brother Pacesetter PC 8200 is a straightforward process. Here’s a step-by-step guide to get you started:
1. Unboxing and Assembly
Carefully remove the machine from its packaging and ensure all components are present. The package should include the machine, foot pedal, power cord, embroidery arm, and several presser feet.
2. Positioning the Machine
Place the machine on a sturdy, flat surface with adequate space for your projects. Ensure it’s close to a power outlet for easy accessibility.
3. Connecting the Power Supply
Plug the power cord into the machine and connect it to a power source. Turn on the machine using the power switch located at the back.
4. Threading the Machine
Follow the threading diagram located on the machine to thread the upper thread correctly. Don’t forget to wind the bobbin and insert it into the machine as per the instructions in the manual.
5. Testing the Setup
Once everything is set up, perform a test run using a simple design to ensure that the machine is functioning correctly. Adjust the tension and settings as needed based on your test results.
How to Use the Brother Pacesetter PC 8200
Using the Brother Pacesetter PC 8200 can be an enjoyable experience with its intuitive design. Here’s how to make the most out of your machine:
1. Selecting Designs
Navigate through the built-in designs using the LCD touchscreen. You can preview each design to see how it will look on your fabric. For more complex or personalized designs, connect your machine to a computer and upload custom designs.
2. Adjusting Settings
Customize your embroidery settings by adjusting the stitch size, speed, and thread tension. These adjustments can help you achieve the desired finish for your project.
3. Preparing Your Fabric
Properly prepare your fabric by stabilizing it to prevent puckering during the embroidery process. Choose the appropriate stabilizer based on the type of fabric you are using.
4. Starting the Embroidery
Once everything is set, position your fabric in the embroidery hoop and attach it to the machine. Press the start button to begin the embroidery process. Monitor the machine as it works to ensure everything is going smoothly.
5. Finishing Touches
Once the embroidery is complete, remove the fabric from the hoop and trim any excess threads. If necessary, wash away any stabilizer that may be left on the fabric.
Maintenance Tips for Longevity
1. Regular Cleaning
Dust and lint can accumulate in the machine, affecting its performance. Regularly clean the machine, especially around the needle area and bobbin case, using a soft brush or lint roller.
2. Oil the Machine
Refer to the user manual for instructions on how to oil the machine properly. Keeping the moving parts lubricated will reduce wear and tear and keep the machine running smoothly.
3. Update Software
Check for any available software updates for your machine. Keeping the software up-to-date can help improve functionality and fix any glitches that may arise.
4. Store Properly
When not in use, cover the machine to protect it from dust and debris. If you travel with the machine, consider investing in a dedicated embroidery machine case for added protection. You can read our review on embroidery machine cases for more insights.
5. Use Quality Threads and Needles
Using high-quality threads and needles will not only improve the quality of your embroidery but also reduce the risk of machine jams and needle breaks.
Comparing the PC 8200 with Other Machines
When considering the Brother Pacesetter PC 8200, it’s essential to compare it with other machines to make an informed decision. Here’s a brief comparison:
| Feature | Brother Pacesetter PC 8200 | Other Popular Models |
|---|---|---|
| Embroidery Area | Large | Medium |
| Built-in Designs | Over 100 | 50-75 |
| LCD Display | Yes | Yes |
| Needle Threading | Automatic | Manual |
| Price Range | Mid-range | Varies |
As seen in the table above, the Brother Pacesetter PC 8200 offers a more extensive embroidery area and a higher number of built-in designs compared to many other popular models. Its automatic needle threading system also sets it apart, making it an excellent choice for those looking for ease of use.
FAQs
A: Yes, its user-friendly interface and features make it ideal for beginners as well as experienced embroiderers.
A: Absolutely! The machine allows you to connect to a computer and upload custom designs for your projects.
A: Refer to the user manual for troubleshooting tips, or contact Brother customer support for assistance with persistent problems.
A: The machine can handle a variety of fabrics, but for best results, use medium-weight fabrics and appropriate stabilizers.
A: Accessories can be purchased from Brother’s official website, craft stores, or online retailers specializing in sewing and embroidery supplies.
In conclusion, the Brother Pacesetter PC 8200 embroidery machine is an excellent investment for anyone looking to explore the world of embroidery. With its vast features, ease of use, and versatility, it can cater to a wide range of projects and skill levels. Whether you are creating beautiful designs on blouses, as seen in our article on naturally beautiful embroidery design on blouses, or tackling more complex creations, the PC 8200 stands out as a reliable companion in your sewing journey. Additionally, if you are considering a sewing and embroidery combo machine, check out our guide on top sewing and embroidery combo machines, or explore our top picks for the best sewing and embroidery machines to find the perfect fit for your crafting needs.