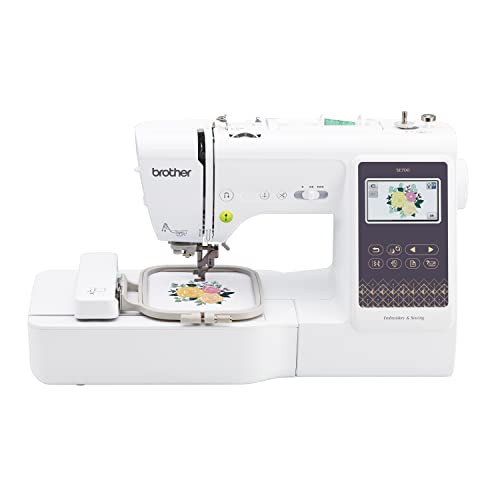
Embroidery offers a unique way to express creativity, whether you’re personalizing gifts, enhancing home décor, or creating professional logos. For those looking to delve into this art form, the Brother SE700 embroidery machine is a fantastic choice. This versatile device combines sewing and embroidery features, making it ideal for both beginners and experienced crafters. In this comprehensive tutorial, we will guide you through the essential steps to get started with the Brother SE700, ensuring you harness its full potential for your embroidery projects.
Getting Started with the Brother SE700
Before diving into embroidery, it’s essential to familiarize yourself with your Brother SE700 machine. This user-friendly machine features a touch screen panel, a variety of built-in stitches, and the ability to import custom designs. Start by unboxing the machine and laying out all components, including the foot pedal, power cord, and accessories like the embroidery hoop and starter thread.
Basic Settings and Setup
Setting up your Brother SE700 correctly is crucial for a smooth embroidery experience. Follow these steps to configure the basic settings:
Powering Up
Connect the power cord to your machine and plug it into an outlet. Press the power button to turn on your Brother SE700.
Adjusting the Settings
Once powered on, navigate through the touch screen menu to set your preferred language, stitch size, and other basic settings. Make sure to select the embroidery mode to access specific embroidery features.
Choosing Embroidery Designs
The Brother SE700 offers a wealth of built-in embroidery designs, but you can also import your own. Here’s how to access and choose designs:
Built-in Designs
To access the built-in designs, navigate to the embroidery menu on the touch screen. You will find categories of designs such as floral, seasonal, and geometric. Browse through these options and select your desired design.
Importing Custom Designs
If you wish to use your own designs, you can import them via USB. Make sure to save your design in a compatible format (such as PES or DST) before transferring it to the machine.
Threading the Machine
Correctly threading your Brother SE700 is vital for achieving flawless embroidery results. Follow these steps:
Upper Threading
- Raise the presser foot to release the tension discs.
- Place the spool of thread on the spool pin and secure it with a spool cap.
- Guide the thread through the tension mechanism and into the thread guide.
- Thread the needle using the automatic needle threader for ease.
Bobbin Threading
For the bobbin, ensure you use a quality bobbin thread for the best results. Fill the bobbin with thread and place it in the bobbin case, ensuring it’s threaded correctly.
Hooping the Fabric
Hooping is the process of securing your fabric in the embroidery hoop to ensure accurate stitching. Here’s how to hoop your fabric correctly:
Choosing the Right Hoop
The Brother SE700 comes with various hoop sizes. Choose one that fits your design and fabric.
Hooping Technique
- Loosen the hoop by turning the screw.
- Place the bottom hoop on a flat surface and lay your fabric on top.
- Align your fabric so that it’s straight and centered.
- Place the top hoop over the fabric and tighten the screw securely.
The Embroidery Process
With your machine set up and the fabric hooped, you are ready to start embroidering. Here’s the step-by-step process:
Selecting the Design
On the touch screen, choose your design and adjust the size and position as needed. The Brother SE700 allows you to see a preview of the design, helping you make adjustments before starting.
Starting the Embroidery
Once you’re satisfied with the design placement, press the start button. Monitor the machine as it stitches, ensuring that everything runs smoothly.
Troubleshooting Common Issues
Even with the best machines, you may encounter issues during embroidery. Here are solutions to some common problems:
Thread Breakage
If your thread keeps breaking, check the following:
- Ensure the upper thread is threaded correctly.
- Check the bobbin for tangles or incorrect placement.
- Use high-quality threads to prevent snapping.
Puckering Fabric
Puckering can occur due to improper hooping or using the wrong tension settings. To fix this:
- Rehoop the fabric to ensure it’s taut.
- Adjust the tension settings to suit your fabric type.
Maintenance Tips for Longevity
To ensure your Brother SE700 continues to perform at its best, regular maintenance is essential. Here are some tips:
Cleaning the Machine
Regularly clean the machine to prevent dust and lint buildup. Use a small brush to remove debris from the bobbin area and around the feed dogs.
Updating Firmware
Keep your machine’s firmware up to date by checking the Brother website for the latest updates. This can enhance performance and fix known issues.
FAQs
A: You can use various fabrics, including cotton, denim, and specialty fabrics, but always consult the manual for specific recommendations.
A: Yes, you can import custom designs via USB as long as they are in a compatible format.
A: It’s recommended to clean your machine after every few projects or whenever you notice lint buildup.
Conclusion
The Brother SE700 embroidery machine is an excellent investment for hobbyists and professionals alike. By following this detailed tutorial, you will be well-equipped to navigate its features and create beautiful embroidery projects. Remember to take the time to set up your machine correctly, choose high-quality threads, and maintain your machine for optimal performance. Happy embroidering!