Knit fabric dyeing is a fascinating process that allows for the transformation of plain textiles into vibrant, eye-catching materials. Whether you’re a fashion designer looking to create unique garments or a hobbyist wishing to infuse your projects with color, understanding the knit fabric dyeing process is essential. This article will provide a comprehensive overview of the dyeing process, including a detailed flow chart, tips, and best practices to ensure successful results.
Table of Contents
- 1. Understanding Knit Fabric Dyeing
- 2. The Dyeing Process Flow Chart
- 3. Types of Dyes for Knit Fabrics
- 4. Preparation for Dyeing
- 5. The Dyeing Process
- 6. Post-Dyeing Process
- 7. Common Issues and Solutions
- 8. FAQ
1. Understanding Knit Fabric Dyeing
Knit fabric dyeing refers to the process of applying color to knit textiles, which are made by interlocking yarns. This method is popular in the fashion and textile industries due to its versatility and the ability to create intricate patterns and designs. Understanding the types of fibers used in knit fabrics—such as cotton, wool, and synthetic materials—is essential as it influences the dyeing technique and results.
Types of Knit Fabrics
- Wool Knit: Known for its warmth and elasticity.
- Cotton Knit: Soft and breathable, ideal for casual wear.
- Polyester Knit: Durable and often used for sportswear.
- Blends: Combination of various fibers for enhanced properties.
2. The Dyeing Process Flow Chart
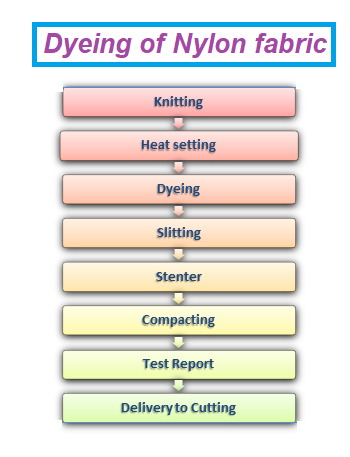
To visualize the knit fabric dyeing process, a flow chart can be incredibly helpful. Below is a simplified representation of the steps involved in dyeing knit fabrics:
| Step | Description |
|---|---|
| 1. Preparation | Gather materials, select dye, and prepare fabric. |
| 2. Pre-Treatment | Wash fabric to remove impurities and enhance dye uptake. |
| 3. Dyeing | Apply dye using chosen method (immersion, tie-dye, etc.). |
| 4. Rinsing | Rinse fabric to remove excess dye. |
| 5. Post-Treatment | Set the dye and finish the fabric. |
3. Types of Dyes for Knit Fabrics
Choosing the right dye is critical for achieving the desired color and finish on knit fabrics. Here are some common types of dyes used in the industry:
Reactive Dyes
Great for cotton and other cellulosic fibers, reactive dyes form a chemical bond with the fabric, resulting in vibrant, long-lasting colors.
Acid Dyes
Best suited for protein fibers like wool and silk, acid dyes require an acidic environment to fix the dye to the fibers.
Disperse Dyes
Used for synthetic fibers such as polyester, disperse dyes are applied at high temperatures to achieve bright colors.
Natural Dyes
Derived from plants, minerals, and insects, natural dyes are eco-friendly but may produce less vibrant colors and have variable results.
4. Preparation for Dyeing
Preparation is key to successful dyeing. Here are the steps involved in preparing knit fabric for dyeing:
Gathering Materials
- Dye of choice
- Fabric to be dyed
- Large containers or pots for dyeing
- Stirring tools (spoons or sticks)
- Protective gear (gloves, aprons)
Washing the Fabric
Before dyeing, the fabric should be washed to remove any finishes or contaminants that could interfere with dye absorption. Use a mild detergent and rinse thoroughly.
Choosing the Right Dye Method
Decide on the dyeing technique based on the desired outcome. Common methods include:
- Immersion Dyeing
- Tie-Dye
- Shibori Techniques
- Spray Dyeing
5. The Dyeing Process
Now that the fabric is ready, it’s time to dive into the dyeing process itself. Here’s how to proceed:
Immersion Dyeing
This is one of the most common methods, where the fabric is fully submerged in a dye bath. Follow these steps:
- Prepare the dye bath according to the dye manufacturer’s instructions.
- Heat the dye bath to the recommended temperature.
- Immerse the fabric and stir continuously to ensure even dyeing.
- Monitor the time based on the desired color intensity.
Tie-Dye Technique
For a fun, patterned effect, tie-dyeing can be a great option. Here’s how to do it:
- Soak the fabric in a fixative solution.
- Fold, twist, or bind sections of the fabric with rubber bands or string.
- Apply dye to different sections, allowing colors to blend or remain distinct.
- Let it sit for the recommended time before rinsing.
6. Post-Dyeing Process
After dyeing, it’s crucial to follow up with post-dyeing processes to ensure colorfastness and quality:
Rinsing the Fabric
After the dyeing process, rinse the fabric in cold water until the water runs clear. This helps remove excess dye and prevents bleeding.
Setting the Dye
To set the dye, you may need to heat the fabric again, depending on the dye used. Follow the specific instructions provided with your dye for the best results.
Washing and Drying
Wash the dyed fabric separately in cold water using a mild detergent. Hang to dry or lay flat to avoid distortion of the knit fabric.
7. Common Issues and Solutions
Dyeing knit fabrics can sometimes lead to unexpected results. Here are some common issues and how to solve them:
Faded Colors
If the colors appear dull or faded, it could be due to insufficient dye concentration or inadequate dyeing time. Consider repeating the dyeing process or using a more concentrated dye solution.
Uneven Dyeing
Uneven coloring can occur if the fabric is not stirred adequately during immersion dyeing. Ensure that the fabric is moved continuously in the dye bath.
Color Bleeding
Color bleeding can be prevented by thoroughly rinsing the fabric after dyeing and using a color fixative if necessary.
8. FAQ
A: Yes, you can dye pre-made knit garments, but be aware that seams and trims may react differently to the dye.
A: The time varies based on the dye type and desired color intensity. Generally, it can range from 30 minutes to several hours.
A: Yes, dyeing can be safe at home if proper precautions are taken, such as wearing gloves and working in a well-ventilated area.
A: You can attempt to overdye the fabric with a different color, or use color remover products designed for fabric.
In conclusion, understanding the knit fabric dyeing process flow chart and its associated steps is vital for anyone looking to experiment with fabric coloring. From preparation to post-treatment, each phase plays a crucial role in achieving vibrant, lasting results. Remember to choose the correct dye type, method, and take note of any issues you encounter along the way. Happy dyeing!